NFTs
Intro
NFTs, or Non-Fungible Tokens, are a type of digital asset that is stored on a blockchain, which is a decentralized and immutable ledger of transactions. NFTs are unique and cannot be exchanged for other NFTs on a one-to-one basis, unlike fungible assets such as cryptocurrencies, which are interchangeable.
NFTs are created by encoding information about a specific asset, such as artwork, music, or video, into a digital token. This information includes metadata that describes the asset's origin, ownership, and other relevant information. The token is then verified and recorded on the blockchain, which ensures its authenticity and immutability.
We have an NFT service that serves as a metadata server for NFTs hosted on our Hyperledger Fabric network.
Here, NFTs are modeled in a way very similar to OpenSea, where the relevant fields have the same meaning as in OpenSea.
The underlying smart contract is an ERC-1155 equivalent on the Hyperledger Fabric network.
Additionally, NFTs have the frozen attribute, which indicates they can no longer be changed.
Fetching NFTs
To fetch the NFTs use the [GET /v1/nft] endpoint.
The appropriate filters are:
- collection_ids, an array of collection IDs
- status, can be
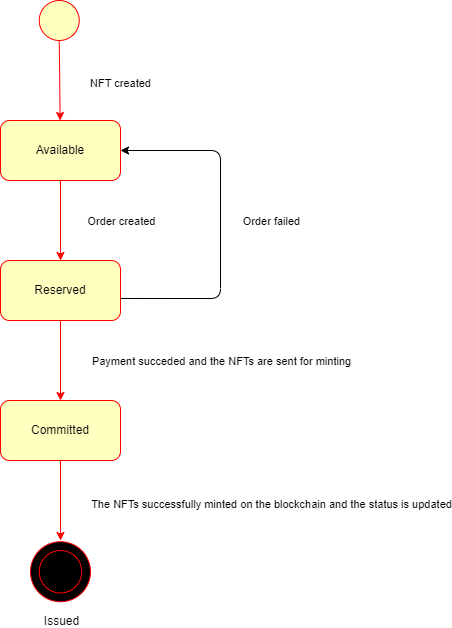
available,reserved,committed, andissued. This is described here attribute_valueandattribute_trait_type, use this to filter NFTs based on which attribute value it contains
Use the with query parameter if you want to fetch the NFT with the attributes or the collection.
Example: GET /v1/nft?collection_ids=1,2,3&with=attribute&limit=10
Minting an NFT
To create and mint an NFT, follow these steps:
- Submit a request to POST /v1/nft with the specified payload, which can be found in the Swagger docs. The required fields are also specified there. You can create the entire NFT model with all the attributes as sub-objects at once, or you create it piece-by-piece.
- Once you have finished editing the NFT, you can proceed to mint it to a user.
- To mint the NFT, use POST /v1/chaincode/{chaincode_id}/nft/{id}/mint,
where
chaincode_idis the contract name, andidis the NFT id you received during creation. A successful response indicates that the transaction has been submitted and will soon be reflected in the blockchain. In the request body, there is anaccountparameter, which is the enrollment ID of the user you want to mint the NFT to.
curl -X POST
    --header 'Content-Type: application/json'
    --header 'Authorization: Bearer $Your_API_key'
    -d '{"name": "Your brand new NFT", "image":"https://upload.wikimedia.org/wikipedia/commons/thumb/4/46/Bitcoin.svg/1200px-Bitcoin.svg.png"}'
    'https://api.bam.fan/nft/v1/nft'
  import { BAM, BaseUrl } from 'bam-ticketing-sdk'

// It is also possible to use a privileged user's credentials
const credentials = new ApiKeyCredentials("Your_API_key")
const bam = await BAM.build({
      baseUrl: BaseUrl.Prod, // Change this appropriately
  credentials
  })

const nft = await bam.nft.createNft({
    name: "Your brand new NFT",
    image: "https://upload.wikimedia.org/wikipedia/commons/thumb/4/46/Bitcoin.svg/1200px-Bitcoin.svg.png"
})
Ordering a NFT
Precondition:
- To buy an NFT, its status needs to be
availableand theface_valueandcurrencyneed to be defined.
NFT status flow

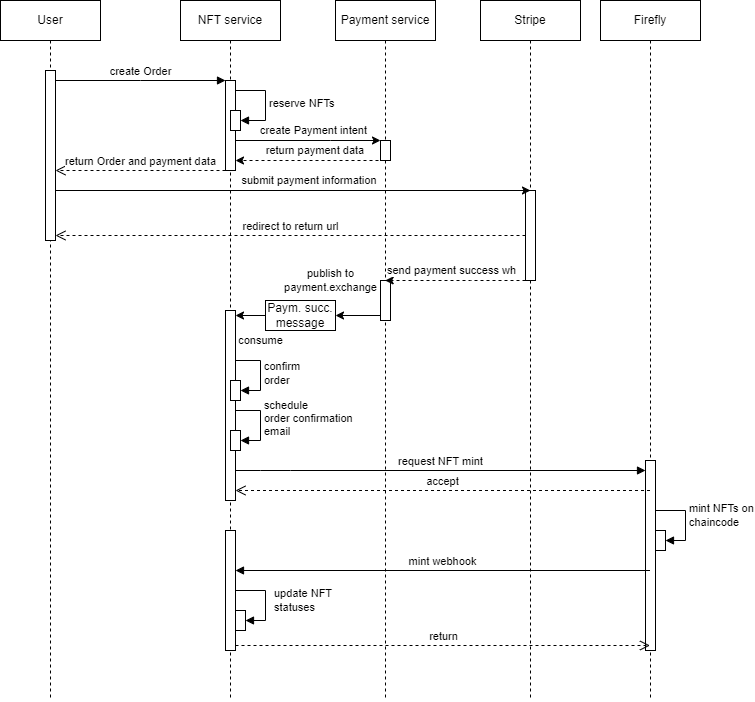
The process:
- To create an order for NFTs, submit to the POST /v1/order with the specified NFT IDs.
- The order is successfully created, and the Stripe payment intent is returned to the user.
Use the
client_secretto instantiate the Stripe elements and allow the user to finish the payment process. For more details, check out the docs. - The user completes the payment, the order is marked as confirmed, the confirmation email is sent and the NFTs are minted on the blockchain.
- The NFTs will be updated on the NFT service with a Firefly webhook.
In code:
curl -X POST
    --header 'Content-Type: application/json'
    --header 'Authorization: Bearer $JWT'
    -d '{"nft_ids": [1,2,3], "owner_id": "purchasers_enrollment_id", "chaincode_id":"erc1155" }'
    'https://api.bam.fan/nft/v1/order'
For more details, check out the diagram:
