Events
The main entities in our system are the events. Depending on the configuration, the events can include KYC verifications, seating charts, free and paid tickets, sectors, timeslots, they can last for several days, occur regularly and similar.
Fetching events
Fetching events is done through the GET event/v1/organizer/:organizer_id/event endpoint. This endpoint has many filtering options, with the most important ones being listed below. Filtering is done through query parameters.
Required
public- if
trueyou get events which are available to all users - if
falseit returns events from your organization
- if
Optional
venuesis a comma-separated list of venue IDs. The response will include events happening at these venues.qis a term used for text-search of eventsfuture_eventsreturns events which start in the future iftrueinclude_occurrencesiftrue, returns all the occurrences separately. Defaults tofalse, returning only single and parent events.sort_bycolumn to sort results bywithcontains an Objection.js-specific RelationExpression. For example, to include ticket_configs with all their discounts, you'd useticket_config.ticket_discount. For more details see Objection.js docslimitis the maximum number of documents returned in the responseoffsetis the number of documents skippedpickis a comma-separated array of fields to return in the response, ie.name,status
Creating an event
To create an event you need to call POST event/v1/organizer/:organizer_id/event with the appropriate info. Only the subcategory is required for the initial call.
You can call PATCH event/v1/organizer/:organizer_id/event/:id to add the rest of the information later. This is mostly beneficial to the user experience as there are many fields to fill. After creation, the event is in DRAFT status and won't be visible nor usable for the ticket buyers until it's published.
Fields required for creating an event are:
start_atend_atgate_timenameticket_configvenue_id
It is recommended to add:
descriptionmain_image_uricontact_emailcontact_phone
Situational fields:
chart_keyspecifying the seating chart on seats.io. If seating charts are used, it is required to call the seats.io API to create the event with that chart and in the workspace which belongs to the same organizer as the event.ruleset_keydetermines which rules for distanced seating should be used. It is also created via seats.io.kyc_level_idwhich defaults to your organizer's KYC levelticket_discountif you have discountssectorif the event has sectors for seatingsectors_map_image_uriif you want to use an image of the venue instead of Seats.io to avoid seating map costs. This is mostly done for free events.tosif a different Terms of Service applies to this event compared to your organizer's default ToStimeslotenables you to define the maximum amount of tickets that can be sold in a period. This is mostly used to limit the maximum number of people at one time in a venue, due to COVID.ticket_formatis used to limit the formats of tickets for the event, for example, to sell only secure tickets. Possible formats are [pkpass,pdf,secure]occurrenceis essentially an array of events with only the required fields, remaining fields default to the main event. It is useful for repeating events.
Publishing an event
Fields required for publishing an event are:
start_atend_atgate_timenameticket_config
The flow to publish an event looks like this:
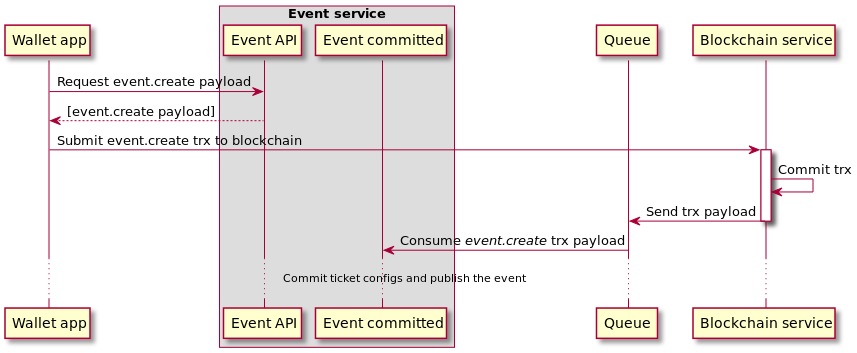
- Get the event publish payload from GET event/v1/organizer/:organizer_id/event/:id/chaincode/publish/proposal. It can also be obtained by scanning the QR code via the wallet.
- Sign the payload and send it to the blockchain service. The transaction signing process is explained here
Sectors
Used when a venue has several areas for the visitors. Each sector has a capacity. For example, the left stage has 100 seats while the right has 200. To which sector the ticket belongs to is specified when creating an order.
Timeslots
Timeslots enable you to have several slots during an event during which a ticket is active, for example, 09:00-10:00, 10:00-11:30 etc.
You can limit the number of tickets in a time slot. This can be used for COVID-19 measures limiting the number of people in the building at the same time.
Seating charts
Seating charts are supported via seats.io. Each organizer gets their workspace on seats.io when they create an account.
To get seats.io credentials, call GET account/v1/seats-workspace with your organizer_name as a query parameter.
With the key and secret_key, you can fulfil all the steps required for having a seating chart on an event.
For an event to have seating charts, several things need to happen:
- A chart with the correct number of seats per category is created on seats.io. The categories correspond to ticket configs.
- Any required rule sets are created
- An event is created on seats.io with this chart and the id of the event in our system.
- The event is updated with the
chart_keyandruleset_key
Discounts
Event times
Start and end times specify when the event happens and its duration. The gate time is when the tickets become usable for attending the event.
Multi-day events
Multi-day events can be achieved by setting up the duration of the event to multiple days and then limiting the validity periods of certain ticket configs to a part of that time, for example, one ticket config would be valid for the first day, while another would be valid for all the days of the event.
Recurring events
An event can be set up with multiple occurrences, which differ in the time of the event at the very least.
Afterwards, the occurrences can be modified. They are set in the occurrence list field during event creation.
Event pictures
Each event needs to have 3 picture formats: 16:9, 4:3 and 1:1. 16:9 format is used for our marketplace, 4:3 format is used when sharing a link on Facebook and 1:1 is used as a link preview and for compatibility with google events. These 3 pictures need not be the same picture.
Republish event
After publishing an event, editing the start_at, gate_time, and end_at fields changes the state of the event to updated.
An event in the status 'updated' has to be republished.
To republish an updated event use the GET /organizer/{organizer_id}/event/{id}/chaincode/update/qrcode_payload
endpoint for fetching the QR code payload that should be scanned by the wallet app and used to invoke the chaincode
function for updating the event.
Republish ticket config
After an event is published, the tickets are successfully created and the ticket configs are in the published state.
Editing the quantity, currency, and face_value sets the ticket config to the updated state, to republish it use the
GET /organizer/{organizer_id}/event/{event_id}/ticket_config/{id}/chaincode/update/qrcode_payload
for fetching the QR code payload.