Quick Start
Let's have a look at the basics!
This quick start will show you how to create a user, create an organizer, create and publish an event and buy tickets for it.
Creating a user
Ordinary user
To create a user, you need to call POST account/v1/user with the user's data. Once created, the user will receive a verification link in the mail. Verifying the email is required for some functionalities if, for instance, the user will have their own organizer.
curl -X POST
    --header 'Content-Type: application/json'
    -d '{"username": "johndoe", "password":"Secret123!@#", "email": "[email protected]"}'
    'https://api.bam.fan/account/v1/user'
import { BAM, BaseUrl } from 'bam-ticketing-sdk'

const bam = await BAM.build({ baseUrl: BaseUrl.Prod })

const user = await bam.account.createUser({
    username: 'johndoe',
    password: 'Secret123!@#',
    email: '[email protected]'
})
Inviting a user
To create a user which automatically belongs to an organizer, you need to [POST account/v1/user/invite] with:
- regular user registration fields
organization_nameset as the organizer to which the user is invitedrolewhich the user will have (1-5)- if
roleis 5 (Custom) you need to specify the exact permissions which the user will get in the fieldgranted_permissionsTo see more about that, go here
curl -X POST
    --header 'Content-Type: application/json'
    --header 'Authorization: Bearer $JWT'
    -d '{"username": "johndoe", "password: "Secret123!@#", "email: "[email protected]", "organization_name: "event-organizer", "granted_permissions": ["event-organizer": ["event.create","ticket_config.create","ticket.invalidate"]]}'
    'https://api.bam.fan/account/v1/user/invite'
// First authorize the BAM client
// There are also API key, JWT, Guest, Service and Wallet credentials
const credentials = new PasswordCredentials({
        username: "johndoe",
        password: "Secret123!@#"
    })
await bam.authorize(credentials)

const user = await bam.account.inviteUser({
    username: 'invitedJohn',
    password: 'Secret123!@#',
    email: '[email protected]',
    organizationName: 'event-organizer',
    // Permissions for the invited user
    grantedPermissions: [
        'event-organizer': [
            'event.create',
            'ticket_config.create',
            'ticket.invalidate'
        ]
    ]
})
Once the user is created and the appropriate permissions granted, you need to create a wallet to be able to interact with the blockchain (ie. buy secure tickets, host events).
Additional info on user management is available here
Creating an organizer
Once you created a user and verified their email, you can create an organizer which enables you to create events that will be sold on the platform. To do this POST account/v1/organizer with the specified info. Field meaning is:
organization_name: name of the tenant organization, umbrella org. of the new organizerdisplay_name: user-friendly namekyc_level_id: the default amount of KYC that will be required on the organizer's events- 0 - no KYC required
- 1 - tickets need to have contact details
- 2 - KYC without face matching
- 3 - KYC with face matching
owner_id: ID of the user who will receive all permissions for organizer management
curl -X POST
    --header 'Content-Type: application/json'
    --header 'Authorization: Bearer $JWT'
    -d '{"name": "fancy-organizer", "display_name": "Fancy Event Organizer", "organization_name": "catapult"}'
    'https://api.bam.fan/account/v1/organizer'
// The owner is by default the authorized user
const user = await bam.account.createOrganizer({
    name: 'fancy-organizer'
    displayName: 'Fancy Event Organizer'
    // Name of the tenant (on production default to catapult)
    organizationName: 'catapult'
})
Creating a wallet
To create a wallet you need to POST account/v1/certificate/enroll with the JWT you obtained by logging in,
specified in the Bearer header.
SAVE the private key which you receive as we do not keep it.
To this identity, all tickets, events and similar will be associated.
It is also possible to call the endpoint without authorization, in which case a new user with a wallet will be created.
curl -X POST
    --header 'Content-Type: application/json'
    --header 'Authorization: Bearer $JWT'
    -d '{"username": "johndoe", "password":"Secret123!@#", "email": "[email protected]"}'
    'https://api.bam.fan/account/v1/certificate/enroll'
const credentials = new PasswordCredentials({
        username: "johndoe",
        password: "Secret123!@#"
    })
await bam.authorize(credentials)
// Creates wallet for the authorized user
const user = await bam.account.createWallet()
NOTE: Certificates are not auto-updated! If you created a wallet without creating an organizer first, you have to reenroll in the wallet app.
Creating an event
To create an event you need to call POST event/v1/organizer/:organizer_id/event with the appropriate info. Only the subcategory is required for the initial call, after that you can PATCH event/v1/organizer/:organizer_id/event/:id to add the rest of the information. This is mostly beneficial to the user experience as there are many fields to fill.
You can find a detailed explanation of all the fields here
Publishing an event
Fields required for publishing an event are:
start_atend_atgate_timenameticket_configvenue_id
The flow to publish an event looks like this:
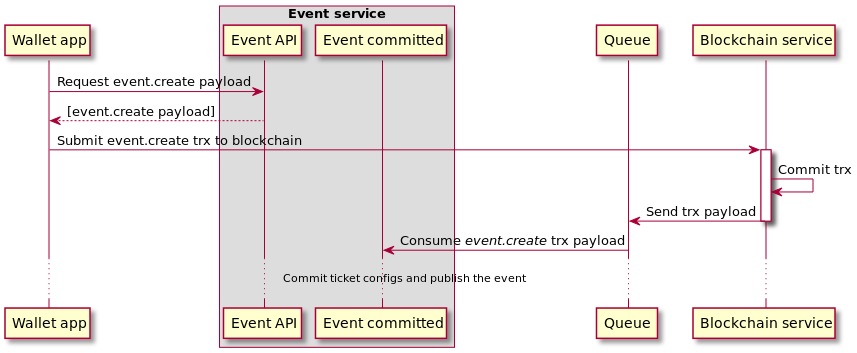
- Get the event publish payload from GET event/v1/organizer/:organizer_id/event/:id/chaincode_payload. It can also be obtained by scanning the QR code via the wallet.
- Sign the payload and send it to the blockchain service. The transaction signing process is explained here
Purchasing a ticket
To purchase tickets you need to create an order with the specified tickets and then create and fulfill a payment. For more details see Order.
Verifying tickets
// TODO: write verify tickets flow